How to Carve a 360
This is pretty much my only trick. The crowds love it and not many people can do it, but it's not that hard to learn and it's not dangerous. These are my best tips, give it a try. As long as you end up on your feet it looks cool. What the heck else are you gonna do with all that kinetic energy at the end of your run? Don't waste it on a skid stop, you came out to make turns right?
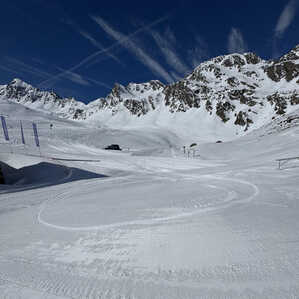
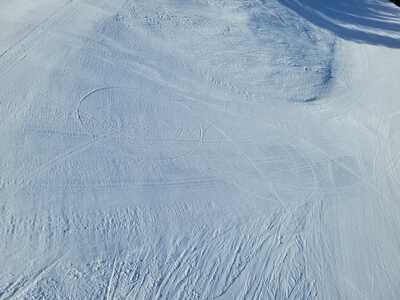
There are at least a few variations to the carved 360, I classify them according the shape of the track they make (the perfect circle, the spiral, the teardrop...). More on those below, what's described here first is the toeside spiral.
1. Head check:
I said it's not dangerous, but that presumes there's no one behind you... That moment as you're coming around and traveling back uphill straight at that oblivious oncoming skier will make you question some very recent life choices... Head check both sides before you start, abort if your zone isn't clear.
2. Equipment
Any hard boot setup will work, soft flexing boards are better, soft tails are best. It'll work with the same technique in soft boots; a wide board with no overhang is best though I have seen it done in somewhat decent style with stock setups.
3. Terrain choice
Flat and wide is the easiest place to learn. Funner if there's a natural bowl shape or quarter pipe, but harder too since you have to constantly adjust your position for the rapidly changing fall line. When you choose a feature, try to approach such that you reach the highest point before you've carved 180 degrees so that you can start gaining speed again.
4. Approach
Start with a lot of speed. Initiate your turn wide and gentle so that you can keep almost all your momentum through the first 90 degrees. I tend to start in a bit of a tuck and just tip the board over a little to start. Any chatter or skid through the initiation will slow you down too much to finish in good style. Minimize the snow displacement by carving wide and shallow to start. Keep your weight balanced over both feet rather than forward as you might initiate a tighter turn on steeper terrain.
5. 90 to 180 Degrees
Put your hand down, carve deep, tighten up the turn radius and start shifting your weight back. Extend as normal through this part of the turn, but get your weight mostly on the back foot. Like way back; the front of the board should start popping up out the snow by 180 degrees. It might help to put your front hand on your front knee, extend that front arm and hang off the knee to lean far back. This is key. The further back you can get your weight, the tighter your turn radius and the more likely you can get all the way around before you stall.
6. 180 to 270 Degrees
Here is the other key technique. Past 180 you're going to be slowing down a lot. You need to maintain momentum and at the same time start standing back up from the deep carve. Do this by pulling your dragging back hand through the snow toward your back toes. This hand serves simultaneously as a moving pivot point to tighten up the carve and as a crutch to help you stand back up. When I look back on my tracks, I can see that the mitten usually touches down early but lightly, gets farther away from my board track (and deeper) as I extend by body up to 180 degrees and then starts to come back closer again. Where the mitten track ends, it's about 20 inches away from the board track - very close to my back toes. Use the back hand like a rudder or an outrigger, as you might use a kayak paddle to turn tight: you're gonna stick it out behind you to the side and then pull it toward the back of the boat/board while leaning back and to the inside of the turn onto and toward the blade/mitten.
7. The Finish
Once you get to 270, even if you're stalled, you should be able to regain your feet by pushing off the back hand. If you can come out standing up, look around for the dropped jaws. If you can come out with some momentum and ride past the gawkers you get extra points for the snub. If your board is soft enough to tail spin and you still have a little momentum left, try the 720 flourish. The Dredman was the first person I ever saw do this finish (at ATC 2014 I think, whichever was the last one). I was gobsmacked, and immediately began attempting to replicate this fantastic style. (I will forever be trying to keep up with The Dredman...)
8. The Perfect Circle
Pretty sure it was John Gilmore who used to put down five perfect circles arranged like the Olympic rings. That was my original inspiration for the carved 360 (circa 2009) and led to many failed attempts. This variation has a similar initiation, but you'll stay centered on the board and balanced over your edge without dragging your hand or leaning back. As you lose speed toward 270 degrees, find yourself in a position with your knees pointed down toward the snow, your body erect and upright and your board high up on edge. Balance there as long as you can and let the board keep turning. You'll need at least some momentum at 270 to complete the perfect circle, it helps to carve very smoothly with minimal snow displacement. This one is among the harder variations, but it's also the least fun and the least cool looking (unless you do five and describe the Olympic rings of course).
9. The Teardrop
This is the track shape that results when you don't have your weight back far enough to match the stiffness and length of your board's tail. I have some pretty stiff boards and some of them would just stop turning as the speed dropped. With practice I learned that I just had to shift my weight even further back on these boards. This is where I start pulling on the front knee to lift that foot and get my center of gravity way back over the tail.
10. The Allez-Oop
This one also leaves a teardrop-shaped track, but it's intentional. Usually performed on a little quarter pipe or side hill type feature, you ride out with speed and look very cool. I like to do these where a traversing cat track intersects a fall line run. This one feels great too, like Tony Hawk's Loop of Death only without the death. You should be more aggressive on the initiation, if you go wide you might end up traveling too far uphill and stalling out. So start by leaning more forward and turning tighter. Try to be at your maximum height by about 180 degrees with your weight back and hopefully enough momentum to keep you going until gravity picks you up again. If you're a bit slow, use your backhand like a fixed rigid pivot point. Straighten it out and put a lot of weight on it; keep your body stiff like a one armed yoga plank and kick your board forward. This should feel like more of a hand plant than a hand drag, even though your hand may still be moving. You can kind of fake this one because you have the advantage of the terrain. Sticking out the straight arm and leaning on it usually works to keep me turning through the stall. It feels like cheating but it's cooler than a face plant when I'm out of speed. So don't give up if you stall when your board is perpendicular to the fall line and your head is pointing downhill, stay strong with a lot of core tension and lean hard on that straight arm; a little forward kick and gravity should do the rest.
11. The Heelside Three
Harder, more awkward and less cool-feeling, but sometimes the terrain just screams out for a heelside three! Same principles: start wide and centered, stay smooth and shift your weight back through the turn, but this time you'll bring your front hand to your front heel to stand back up. Hard to stand back up on the heelside but it can be done with practice. If you have enough underhang on your setup, your board will continue carving a surprising distance while you're sitting on your butt too. So you finish up sitting, but it still looks and feels cool. The heelside 360 also affords a great opportunity for the backspin turtle finish if you're into breakdancing...
So this is what I've figured out through many winters of trial and error, plus video and track analysis. I hope it speeds you through the learning curve for this trick. It's always hard to put into words what is only known to muscle memory so by all means add your own descriptions and experiences. Different descriptions will resonate with and make sense to different people. Even with all the beta, it's gonna take a few tries. I hope to see more of you guys doing this trick at MCC 2022, and adding your own unique style and flourish.
I've added a slow motion video for the visual learners. Note how the front of the board pops out of the snow through the second half of the first 360. That tells you how much I'm leaning back. Watch carefully too the moment when my dragging hand comes off the snow. See how some snow is thrown toward the front of the board? That will give you an idea how hard I'm pulling on that back hand to regain my feet, and which direction the force is applied. Ignore the edge catch face plant, I don't know who left that pile of snow there...
I'm just slaying...
That's easy!
So, I found out...
I'm just slaying...
- 21 Forums
- 227 Topics
- 2,206 Posts
- 0 Online
- 511 Members


