Boot mods for filling out space
Let's share some boot mods if you, like me, fucked up and bought boots half a size too big you don't have to try to sell them or give them away!
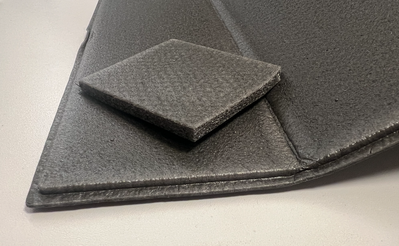
I found some XPE foam seating pads for approx 3 USD a piece, about 6 mm thick. Used as an insulating layer if you want to sit on a rock when you're hiking or things like that. I needed 1 and a quarter pieces to "fix" my boots. This includes waste and some trial and error on my part.
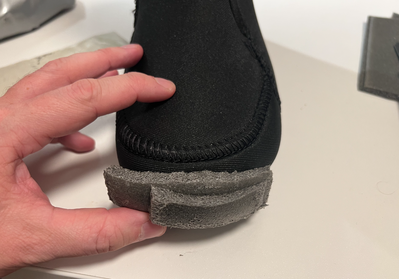
I cut out pieces to fit into the front of my boot, and since my big toe is about 5mm or so longer than the rest of my toes I added a second shorter piece to make sure I get full contact on all toes, not just my big toe, without making my big toe curl up from being mashed into the high density foam, I tried that first, it was seriously uncomfortable.
For the left liner I cut one longer strip that starts around mid foot and curls up in front of my toes, this is what takes up the extra room for the big toe, the sorter piece takes care of the rest. This also give me a bit of toe lift inside the boot on my front foot so my thinking is I don't have to mod my bindings by lifting my foot inside the boot.
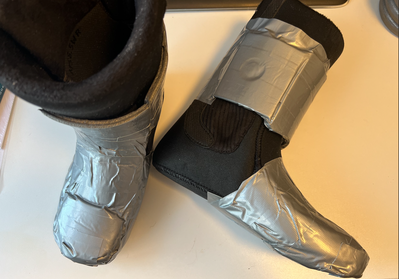
On the right one I didn't try the opposite approach, I made two strips that I taped and then added an additional strip on the top to take up that room as explained a bit further down.
I also noticed that I had quite a bit of vertical room over my toes, which makes sense because I have very high insteps but my feet are normal height over my toes, so the rise under my front foot made the boot snug up real nice over my toes. To get the same feeling I put padding on top of my right boot, but made sure to not put padding at my instep.
On my left foot I put an additional square of padding under the ball of my foot, but I had to cut it short of my toes or it felt like my toes were pointing up which wasn't very nice feeling at all.
I also have very skinny calves but wide feet and apparently if you have wide feet that's not allowed so I filled out around my calves too. For my right foot this just meant running a strip of foam from toes almost all the way up the boot, I left about 3-4 cm for aesthetic reasons, I don't want everyone to see my boots are made out of duct tape! I also added padding on the right and left side .
Note that it requires a bit of trial and error, a carpet knife or sharp scissors and the aforementioned foam. The extra foam padding around my leg also made the boot noticeably stiffer, probably because I'm now able to actually fill out the boot to make use of the stiffness that's there.
We're here to learn from other peoples mistakes right? We've finally gotten some snow here in Stockholm and my local man-made hill has opened.
Posted by: @superfelixOn my left foot I put an additional square of padding under the ball of my foot, but I had to cut it short of my toes or it felt like my toes were pointing up which wasn't very nice feeling at all.
Yeah, so this was a terrible idea and I should have realized it before doing it. This put a lot of pressure on the transverse arch which made my toes go numb after about 1 hour of riding or so. 2/10, do not recommend. I will remove this and just keep one layer. I will probably do the equivalent on the other boot and just have one layer of foam on top of the boot instead of two over the toes.
The rest of the foam padding worked well though!
Posted by: @superfelixWe're here to learn from other peoples mistakes right?
Absolutely! Thank you for posting.
Get the right size boots for sure. I also have a history of buying too big. Make sure to do a shell fit test before you buy because new liners can be very puffy but they pack out quickly leaving loose boots.
For a performance fit, you should only be able to squeeze one finger (say, 7mm) behind your heel in the shell without the liner.
For carving you want the tightest shell you can ride without pain. Upgrade your liner too, snowboard boot liners are generally garbage, even if "Intuition" is printed on them.
Try the Flo Liners from UPZboots.com. These are designed for a snowboard race boot and they perform very well in soft boots. Comfortable, moldable, durable and high performing.
I'm just slaying...
Posted by: @wild-cherryAbsolutely! Thank you for posting.
Get the right size boots for sure. I also have a history of buying too big. Make sure to do a shell fit test before you buy because new liners can be very puffy but they pack out quickly leaving loose boots.
For a performance fit, you should only be able to squeeze one finger (say, 7mm) behind your heel in the shell without the liner.
For carving you want the tightest shell you can ride without pain. Upgrade your liner too, snowboard boot liners are generally garbage, even if "Intuition" is printed on them.
Try the Flo Liners from UPZboots.com. These are designed for a snowboard race boot and they perform very well in soft boots. Comfortable, moldable, durable and high performing.
Yes! But to clarify, the reduction of boot length worked perfectly, I have a really snug fit now. I would recommend everyone that have sized their boots according to when the big toe touches to experiment with taking up the room from the second toe all the way to the pinky, I think this would allow you to ride a boot that fits more snugly without having to compromise the fit due to one toe being significantly longer than the others. Success of this will vary depending on the shape of your foot and toe box of course. I have a very square foot, big toe is just 5 mm longer than the next three toes and the pinky comes in 5 mm shorter, and my boots have a square toe box, so for me padding the extra length for my middle toes really made the boot fit snug without compromising comfort for my big toe.
My mistake was that I overdid it when it came to taking up vertical space in the front of the foot, specifically placing extra padding just under the ball of my foot which made my transverse arch collapse.
Right now, the only downside is that my boots have an unnecessarily large footprint relative to the size of my feet and the model I've chosen. Considering my current skill level and tiny feet the extra 5mm or so of boot footprint is not a big problem for me, I have zero boot overhang on the 260 waist width Stranda Shorty in 164, on the front foot I even have a bit of underhang or whatever you should call it, with how I have set up my bindings.
- 21 Forums
- 227 Topics
- 2,206 Posts
- 2 Online
- 511 Members


